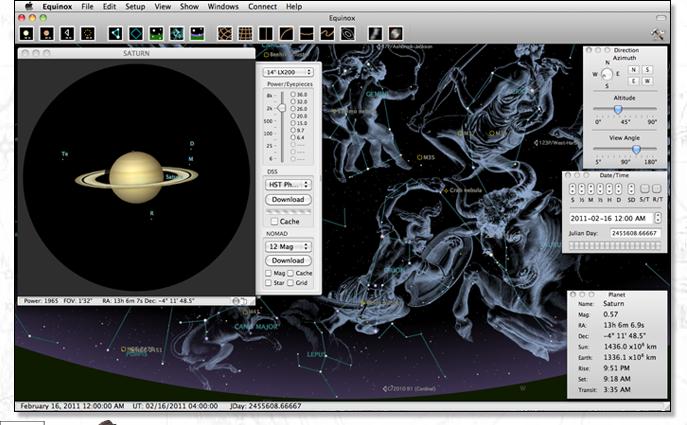
I retired in 2002 and moved from Toronto to Prospect, Nova Scotia. For the first time I have dark skies in my back yard so I thought I would build an observatory. At first I was going to have a roll off roof design, but I knew that I could not build it by myself. I quickly became uncomfortable with the construction services available to me here in Prospect so I opted for a 10 foot PRO_DOME¨ by Technical Innovations. I have a Le Sueur pier and I have ordered the new Meade 14" LX200 SCT. This web site will document the building of my observatory.
[ Home ] [ Site ] [ Excavation ] [ Holes ] [ Concrete ] [ Dome Arrives ] [ Platform ] [ Dome ] [ Inside ] [ More Inside ]
[ Pier Seal ] [ Data Lines ] [ Table ] [ Mount ] [ Caulk ] [ Power ] [ Railing ] [ Done ] [ LX200 ] [ First Light ] [ Second Light ]
[ Moon and Mars ] [ Juan ] [ SBIG ] [ Kendrick ][ Snow ][ ETX ]
I have about two acres of land composed of black spruce trees, very dense sheep laurel and winterberry growing on rocks and a bit of mud. I had to buy a bush cutter just to get into my land. Here is the area that I eventually marked off for the site of my observatory. Because the land is so rough I designed a platform that will be two feet above ground level. The dome will be built on the platform.
Things seem to get done at their own pace in Nova Scotia. What I would have expected to happen in a week in Toronto takes a month, maybe longer, maybe never in Nova Scotia. However, finally the first stage of the observatory building began in August - clearing the site. Here the back hoe crashes through my woods to get to the site.
The back hoe can dig up the bush quite easily but what lies underneath is a mixture of rocks, some very large, and wet dirt.
I wanted to preserve as many of the trees as possible. This will limit my horizon in places but I prefer that to cutting down my woods. There was only one tree that had to be taken down. Black spruce have very shallow roots so the back hoe had no problem removing it.
Once the tree was gone clearing away the bush was easily done by the back hoe. A lot of bush, dirt and roots began to pile up very close to my lot line. The back hoe eventually pressed it all down so that it is at ground level but it is not very attractive. Well, at night I won't see it.
After all the bush had been removed I saw what the land was really like - rocks with a bit of mud. This land is going to be very difficult to work with and I began to get a little concerned about how anything could ever get built on this stuff.
The gravel truck showed up and the back hoe began laying down a path out to the site. Without a decent path there would be no way to get anything back there. Other than the tracks left by the back hoe, all the paths in my woods had to be cut with my bush cutter. Because the land is so rough the paths are quite difficult, with lots of ankle busting holes and steep mounds. Of course, without using my bush cutter there would have been no way to get out there at all.
The gravel used to lay down a path to the observatory site has turned quite hard and it forms a very walkable path. This should prove invaluable once I have to get all the observatory dome bits out there along with all the required tools (imagine the tool section of Home Depot - you've got the idea).
Before the holes for the platform corner posts and telescope pier could be dug I had to mark off where everything had to go. The platform will be 12 feet square and two feet high with the pier center offset 17 inches due south. This meant that I had to mark due north so one clear night I went out and sighted along Polaris. The biggest problem in marking everything was that I could not hammer wooden stakes in the ground where I wanted to - too many rocks.
After all my careful layout of the site the back hoe came in and simply wiped it all out. Any thought that this was going to be a precise operation vanished when the first hole became a huge misplaced mud pit.
Sono tubes were placed at the platform corner locations for the concrete posts, but we had long since lost the exact locations. And because the land is more rock than dirt there was surprisingly little fill to put back around the tubes. What fill there was quickly became very watery mud as water literally poured into the holes.
The site was left for the day in less than perfect condition. The sono tubes where not even close to being square and the telescope pier frame was not in deep enough. All the concrete has to extend well below the frost line or the platform and telescope will shift around every winter. I measured the exact dimensions of where the sono tubes were - they formed a lop sided trapezoid - and figured out where I had to move each sono tube to square things up. By this time it was night. The next morning I set out to move the sono tubes around. Well, after sitting all night in water the bottom of the sono tubes broke apart when I tried to dig them out. I worked for most of the day and ended up with an almost square sono tube placement but with several of the tubes shorter by a foot or so.
After a week of waiting for the concrete I was starting to think that my observatory was going to be nothing more than a bunch of big holes filled with water. The nights are very cold and every morning the water in the holes was frozen over. And of course the sono tubes were now completely water logged. The telescope pier frame was not deep enough so I tried to hammer it down into the mud but it had gotten a bit crushed when the back hoe filled in some dirt around it. It was now a misshapen, hammer damaged, too high frame filled with water and ice. As I sat in the cold mud and looked around the site I was beginning to question the wisdom of trying to have an observatory in Nova Scotia. Of course I have already ordered the dome and scope and the expense of all of this will shorten my retirement by years so I was not in a good mood.
The concrete arrives! The back hoe filled in the holes by digging even bigger holes off site and then brought in gravel for a top fill. Of course the sono tubes shifted from my carefully placed positions when the back hoe filled in the holes, but at this point I did not care if the platform ended up as some weird shape.
Here the telescope pier frame is carefully filled with concrete. My observatory site is a fair distance from any access point so the concrete had to be brought in by the back hoe, one bucket full at a time. The closest access ended up being from a neighbor's driveway and then across my lot to the site. They may never speak to me again. I could have had the back hoe follow my walking path but that would have destroyed the path as well as dig up my front lawn.
I was told to wait before I set the Le Sueur J-bolts into the telescope pier concrete, otherwise they might sink to the bottom. Well, when I did start to set them in place the concrete was beginning to cure and the bolts would not go down deep enough. I literally had to jump up and down on the J-bolt frame to sink it into the concrete. These bolts have to be aligned true north (according to Le Sueur) and very level. Having to jump up and down on the bolts tends to move them off from any precise position. The thought did occur to me, as I was balancing myself on the bolts, that if I screwed this up I could kiss my observatory goodbye. Fortunately the bolts ended up deep enough, level and aligned north within the required 5 degree accuracy.
After all the concrete was poured and the gravel fill was spread around the site looked much better. I spent the next day leveling off the gravel and cleaning up a bit. Retirement seems much better today.
I spent a morning at customs getting my dome out of hock and then learned that the "residential lift gate" service I paid for was not possible. Seems the crate is too large to fit on any truck lift gate known to man. To solve the problem I contracted a tilt bed truck to go get the crate at customs and deliver it to my house. The crate is 7'X7'X4' and weighs 900 pounds - much of that weight being the crate itself.
The truck bed does in fact tilt down to ground level. Of course my driveway is not level so there were a few problems as to where exactly to put the crate. I also did not want it to block my garage so I could get my car out.
The idea is to get the front of the crate on the driveway and then the truck bed moves back. The crate simply slides off the truck. Well, my driveway slopes quite a bit where it ended up going so this was not a completely smooth operation but the crate did end up in my driveway, off the truck and with no damage.
It took a large crow bar, a hand sledge hammer and a pair of metal cutters to open the crate, but there is my dome! I was a bit surprised at the lack of packing. No big pieces of foam or anything except some cardboard and a little bubble wrap. However, all the pieces are undamaged except for a bit of scuffing (which I did myself trying to unpack the crate by myself).
Because the platform for the dome is not built yet I moved all the dome pieces into my garage. Each piece can be lifted by one person but some of the parts are large and awkward to handle by yourself. Just as I was about to yell at a blue jay my neighbor came along and helped me lift the larger pieces into the garage. And it is -5ĄC this morning, so my hands where getting numb. Thanks Vern. Now if I can just get my platform built...
The platform is built! The Le Sueur pier was bolted onto the J-bolts and leveled first so the frame could be built around the pier. The frame was constructed on the concrete corner posts in such a way that the height of each corner can be adjusted enough to level the frame very accurately. Everything is screwed together - no nails. I took many pictures as the frame was constructed but it was so cold that the camera battery went dead and I lost all the early pictures.
The Le Sueur pier is not at the center of the platform, nor at the center of the eventual dome. It is 17 inches due south of the dome center. That should place the scope at the dome center once the scope fork is tilted to my latitude - in theory! The top of the pier is 30 inches above the platform floor and the platform itself is about two feet above the ground. That will give me enough room (just) to crawl under the frame to attach the nuts onto the dome mounting bolts.
There was a couple of days delay to complete the platform due to a blown truck water pump and a -25ĄC wind chill, but it is done! It even warmed up enough to melt the snow. The platform is level to within 1/8 inch and is rock solid. The entire platform is screwed together, no nails, uses 2X10 joists and even has two pillar supports underneath to eliminate a slight bounce. If you are in the Halifax area and need a really good carpenter I now know one.
Last night was clear (and unbelievably cold) so I went out and marked a north line from the center of the pier to Polaris. This is necessary in order to locate where the center of the dome should go. After the platform was completed I drew the outline of the dome and inner flange (119 inches diameter). It is quite windy today so the dome sections would sail away if I took them outside of my garage. Looks like dome building starts tomorrow!
What I thought would take a long time didn't, and what I thought would take half an hour took an entire day. First thing in the morning I carried all the dome sections from my garage to the site and laid everything out on the platform in the correct positions. Bolting the sections together was very easy. The next step was to make the wall ring circular (this is the all day part). The instruction manual says that you can "nudge" the wall sections up to two inches to make it circular. Well, not if the platform is covered in frost! The entire wall ring slid every time I tried to "nudge" anything. I ended up having to screw each section to the platform, push on the opposite side, screw that down, then measure the diameter. Repeat all day. One, this can not be done by measuring a diameter. Two, even if it could the door stubs refuse to cooperate with the rest of the ring. I finally figured out that I had to construct a center reference and measure a radius from there. By the time I had the ring reasonably circular I was working by moon light.
The next morning, in the pouring rain, I drilled the bolt holes through the wall base flange into the platform. Up to this point I had the ring circular but just screwed into the platform. Of course most of the factory locations ended up in the middle of a joist so I had to reposition most of the bolt locations. This was not difficult although I did not particularly enjoy crawling under the platform to attach the nuts. And crawl under the platform again to tighten the nuts. And again and again... I had prepared cedar shims and the next step was to level the wall ring before locking down the bolts - elevating the entire wall enough so the door would swing freely. I have a water level, which is about the only way you can do this. Well, either my platform isn't as level as I thought or the door stubs were made for someone else's dome. Another all day effort and the door still scrapes on the platform a bit.
The next day was beautiful, sunny and about 5ĄC. I carried the dome sections to the site and discovered that the person who was going to help me had decided to move to another planet (or at least out of cell phone range). The dome construction really needs two people (10 would be better) so there I was, dome quadrants all around, sitting in the dirt. A neighbor wandered over to see what I was doing and agreed to help - he now has a life time pass to use my observatory! Bolting the dome quadrants together proceeded quickly and we lifted the dome halves onto the support ring. I taped down the halves and was thankful that there was no wind. Even a slight breeze would have easily blown the dome halves off the wall. We discovered that lining up the holes in the support ring and the dome requires someone outside and someone inside the wall. There is no way this can be done by one person. And to get the dome into the shape of the support ring is a major effort - the outside person has to push on the ring while the person inside has to push on the dome with all the force you've got. We found that, unlike what the instruction manual suggests, you have to do the bolts in order. Start at one end of the dome half and work your way around the dome. After you bolt down one end the other end is over two inches off from the hole in the support ring. You have to form the shape as you work your way around the dome.
The shutter sections simply rest on top of one another, and after a bit of work the shutter opened and closed correctly. However, I discovered that there is no way to open or close the shutter without a step ladder - right where the telescope will be. I did not buy the optional electronic shutter mechanism but I now question exactly how optional it really is. Anyway, by the time I had installed the shutter restraint system it was dark so I had to tie down the shutter with a rope for the evening. The next day, when I took this picture, I drilled the shutter locking holes and a hole for the anti-rotation lynch pin. I installed the dome rotation motors and power supply but in the pouring rain the inside of the dome is quite wet. As water was dripping down all around me and I was standing in a pool of water I decided not to plug in the power supply.
While I was working inside the dome I kept the shutter closed in a failed attempt to warm it up. My little heater took the edge off the cold but it never got above freezing. I have what was a wet rag frozen to the floor - it may be there all winter. I also discovered that the key lock on the shutter gets ice inside so that it is impossible to unlock it. I had to heat the lock before I could get inside this morning.
The factory drilled the power supply holes so that you could have the shutter switch and key lock outside the dome. However, I did not buy the electric shutter so I mounted the power supply switches inside. This left two large holes in the dome so I had a brass plaque made and mounted it over the holes. I think it is a nice touch in any case.
This photo shows the power supply and the DOME-TRACK relay box. The relay box comes with some sticky tape that is completely useless - at least at these temperatures. I drilled a hole in the relay box cover and bolted it to the wall flange, but the only way the cables made sense was to mount it backwards. I then tried to get the tape off the box - it may not stick to fiberglass but it sure sticks to metal.
There are two rotation motors in the dome. The wiring from the power supply to the relay box to the motors is straight forward, although the polarity label on the relay box power cable is next to invisible (I opened up the box and labeled the power cable myself before I saw the little + sign on the wire). Wired this way the motor switch on the power supply is not used but I prefer the DOME-TRACK control box anyway.
I ordered the sound boxes for the rotation motors after seeing the motor leads - they stick out quite far from the wall and are completely exposed. Even with electrical tape over them I was worried about someone (like me) backing into them and getting 12 volts through the back. Well, after I tried the motors for the first time I know why they offer sound boxes - the motor noise is ear splitting. The sound boxes cost US$25 each, but shipping was also US$50. Add customs and exchange and these two plastic boxes cost me over C$170. For that kind of money I thought I would get something that fit - they don't. I had to muck around and drill and re-drill and cut away sections and remove packing and poke and prod these things so they fit on the wall and didn't jam up the motor tension arm and spring. I also discovered that, at least at -5ĄC, the plastic cracks very easily. And the motor noise is still very loud.
Today was sunny and above freezing for the first time in weeks. I bought the weather vane at a trade show in Halifax months ago and finally got it mounted at the edge of the platform. It just seems to go with an observatory. I had it stuck in the ground in back of my house but it kept getting blown over. If it gets blown over now, so will my dome.
All the power panels, AC outlets and lighting is done. I have a long extension cord, well, several, running to the site now, but in the spring when the ground thaws I will have proper AC run out there. All the enclosures are weather proof - it gets very wet inside. Hopefully after I caulk the dome in the spring (it is too cold now) it will stay a little dryer inside. If you click on the picture a larger version should show the labeling better.
The light fixtures are water tight but they also protect the bulbs if I should lean into them. I have three lights around the dome with darkroom red bulbs. These bulbs are a very dark red and should be perfect to preserve night vision. I also have the lights on a dimmer switch so I can adjust the light level very low.
After digging myself out from last night's storm I installed the RJ-22 jack and the pier seal. RJ-22 jacks and straight cables are very hard to find, especially weather proof versions, but I found a store in the States that made up what I needed. The telescope RS-232 connection uses RJ-22 so I had to use that for the data cabling that will connect MPj Equinox to the scope. The pier seal is made from a flexible sheet of rubber that I cut to size. I felt I needed to seal the opening in the floor around the pier so that insects (and snow) will have a harder time getting into the dome. The rubber should prevent any vibrations from the floor being passed into the pier.
I took this shot of the dome after I finished with the inside work today. With the luxury of not having to go anywhere if I don't feel like it I find that I like snow, the more the better. The land is quite beautiful here in winter.
I admit to my cowardice - this is the first time I have been out to the dome in weeks. The cold wave has been unbelievable here (so much for the ocean moderating the temperature). But the last two days have been warmer so I ventured out to the dome to do the electrical wiring for the computer connection. I decided to stay with the RJ-22 jack even though I discovered that the LX200 has a 6 conductor RJ-11 jack for the RS-232 connection. First, I have a Meade #505 cable that has a RJ-22 plug as well as the Celestron NexStar cable that also has a RJ-22 plug. RS-232 connections only use three wires anyway, so as long as everything is wired correctly it does not really matter what type of jack you use. I used a 6 conductor wire with a RJ-11 plug for the LX200 so that if I ever need to connect to the second RS-232 port I will have the wires in place. I also ran a 4 conductor cable with a RJ-22 plug so that I can connect to my NexStar if I ever want to.
My hands were quite numb when I wired the RJ-22 jack, so I checked all the connections with a volt meter before I sealed up the jack. I did the tests from the DB9 connector (that connects to my Keyspan USB/Serial adaptor) to the plugs at the telescope end of the cables. I also carefully documented all the connections if I ever need to modify them in the future.
This photo shows the weather sealed RJ-22 box at the far end of the dome wall and the carpet. I put the carpet down weeks ago but never took a picture of it. I have screwed down the carpet at the door and around the pier but I have not nailed it down anywhere else. The carpet is so frozen that I suspect it will expand a bit once it warms up - so I will nail it down then.
Carpentry is not something I do, but I managed to make a computer table that turned out surprisingly well. It is bolted to the dome wall flange and has support legs. By making it myself I was able to get the shape to match the wall curvature and extend just enough for my PowerBook. The table is located next to the RJ-22 jack and a power outlet. I could also bolt it in other positions around the wall if I ever need to.
While I was installing the computer table I noticed that the PVC conduits had filled with water and then froze. Last week Nova Scotia had a day of heavy rain and because it has been too cold to caulk the dome it leaks - a lot. So I guess the conduits filled up with water and then froze. The big question is whether the data cables have broken or not. And how do I get the water out of there once it warms up? And if the cables have not broken will they survive frozen in ice for the rest of the winter?
Today was the first day in months that the temperature was above freezing, well, one degree above. Meade has delayed shipping the 14" LX200 but I decided to put the Le Sueur Polaris mount onto the pier. Once I get the scope I will have to align it as accurately as I can. This mount has many controls and contact points that have to be adjusted so I suspect that getting a good alignment will be a difficult task. This photo shows the new counter weight assembly from Le Sueur. They say you can remove it after the scope is aligned but I think I will keep it in place to provide less lateral stress on the pier. Now I need warm weather so I can caulk the dome AND MY SCOPE! Meade, are you listening?
Spring has arrived! Today was sunny and about 10C so I caulked the dome. I have been waiting for the weather to warm up enough to do this for weeks. OK, so it is probably the messiest caulking job in history, but I did enjoy working in the dome again. And I learned a few things about caulking along the way. First, cut the nozzle at a 45 degree angle and not too large. Push the caulk into the seam rather than pulling it along behind you. Go very slow and don't stop for anything until you hit another seam. Well, I learned these things after I had made a complete mess, but the last seam did come out real nice.
May 4 - It rained yesterday and last night. This morning the inside of the dome was dry!!!
Now that the inside of the dome should stay a little dryer, and to celebrate Spring in Nova Scotia, I moved my observatory chair into the dome. I also tried the dome rotation motors for the first time since last fall and everything worked fine. Actually, the dome is just about finished. I have to seal the bottom of the dome wall, stain the deck and run two 15A lines out there, but the dome itself is ready. Meade, where is my damn telescope?!!!
Power to the dome! The electrician arrived with a crew of trench diggers. My path out to the dome will never be the same, nor will my lawn, but I have real AC power in the dome now. They buried a 30A line inside a conduit to the dome and gave me a new circuit breaker inside the house. Fortunately the electrician did not seem too upset with the wiring that I did myself inside the dome.
A circuit breaker box was installed inside the dome, as well as a new breaker inside the house, so that I can cut the power from the house when the dome is not in use or from inside the dome if the need ever arises. Like when my scope starts to smoke or my PowerBook melts. 30A may seem a bit excessive but it gives me the option to put lots of stuff out there. And if I ever get a CCD camera with Peltier cooling that can chew up over 7A alone.
The railing around the dome entrance is complete. It was built in the pouring rain, then a thunderstorm hit, then I cracked my head on the dome shutter, then... Anyway, if the platform ever dries out I will stain it and then the observatory is officially done. I am sure that there will be all sorts of things I will want to do inside once I get my scope and see what I need to add, but it looks like that is still quite some time away.
The platform dried out, well, almost, and I stained it and the railing. I did not want a color that distracted from the dome or was too bright but I needed something that would show up with a flashlight. Perhaps I lack imagination but I picked a neutral grey. Actually, it looks quite nice. I used a semi-transparent stain and was very sloppy applying it, but the intent is to protect the wood.
I still have no word on when Meade will deliver my LX200, so I mounted my NexStar 8" on the pier. It looks a little lost on top of that massive pier and inside a 10 foot dome, but at least I will be able to use the observatory while I wait on Meade. I am working on a webcam interface for MPj Equinox version 3.0 and bought a FireWire iBot for testing. Well, I've been hooked. I have added a new page to this site to document my adventures in webcam astro-imaging.
The 14" LX200 arrived! This is one monster scope. With the help of two very strong neighbors the scope was mounted on the Le Sueur pier late yesterday. I then installed the Dome-Track sensors, finder scope, micro-focuser and cables. By then it was dark so I closed up the dome and anticipated starting the drive training and other setup things today. Well, not a good idea in the rain. I took these pictures in the drizzle but then had to close up the dome when it started raining again. Oh, the hat. I hate hats. However, this is black fly season. I drench the hat in deet and the black flies stay away (well, everybody stays away).
These pictures do not really convey the size and weight of this scope. You stand next to it and all you can think of is how big it is. In university I used telescopes where you had to ride around on a platform to reach the eyepiece, but this scope is MINE! It is a great feeling.
I did get to turn on the power when it briefly stopped raining. The drive motors are quieter than my little ETX (think meat grinder full of sand), which was a pleasant surprise. However, I had to close up the dome before I got to do any real testing. But after waiting nine months for this scope to arrive I don't really mind waiting on a bit of rain.
12 June - A bit of rain is one thing, but this is getting ridiculous. It has been cloudy, foggy and raining non-stop for days. There sits my beautiful scope and I have not had one night when I could use it. "First light" still awaits.
First Light !! Well, sort of. Last night had high clouds brightly illuminated by the full moon but I did manage to drift align for azimuth and altitude. I found two stars that did show through the clouds just enough to do the alignment. My reticle eyepiece is an old one at 12.5mm - probably not nearly enough power but I don't have a barlow. So what I lacked in power I made up for by time. I think my alignment is quite good, but I will have to check it out with stars that are not fuzzy blobs struggling to shine through the clouds.
I realized that for azimuth alignment putting my shoulder against the balance weights would probably lack a bit of precision. Le Sueur offers an optional azimuth control (with welded pieces) but to save money I did not order it. Wrong choice! Anyway, I built a contraption out of nuts and bolts and angle pieces that I had around with lots of epoxy. This arrangement does not offer much range, maybe a degree or two at most, but it actually worked. I got the azimuth alignment nailed with it.
I discovered last night that my Dome-Track sensors had fallen off. Actually both velcro belts had come off. The velcro sticks fine, its the glue that holds on the velcro patch that let go on both belts. To solve the problem I hammered some metal eyelets through both patches. I now have the belts back on the scope and quite tight. Hopefully the belts will hold this time.
My first webcam shot with the LX200 14"! Not great, but the conditions were horrible - see the description on the webcam page. I do not have a CCD camera, so I do not have any record of what I could see, but this was the first night since I installed the scope that I had reasonably good seeing. Maybe last night was the eye of the perpetual rain storm. There was a lot of moisture in the air, and by 1:00 AM dew started to be a problem, but I have a very inexpensive dew removal system - a hair dryer. Anyway, the 14" is a marvel. My alignment seems very good - I could slew to any object and there it was, dead center. I have added a Sync command to my LX200 control window and that worked wonders.
After doing a quick webcam shot of Jupiter before it went below my tree line I started looking around at globular clusters and double stars. It was still twilight so I left galaxies and nebulas until later in the evening. The Hercules Cluster in a 14" SCT is breath taking. All evening I kept going back to it. By about midnight is was dark and I headed for the Whirlpool Galaxy. I could see detail and structure in the galaxy arms. The same with the neighboring Pin-Wheel galaxy. I could look right into the Ring Nebula and the Blinking Planetary actually blinks! I spent the next two hours looking at everything in the MPj Equinox best list. Galaxies, nebulas, clusters, double stars, minor planets, I looked at everything. After all the grief in building the observatory and waiting nine months for the scope, last night made it all worth the effort.
Another clear night! I observed and took webcam images until about 4:00 AM. I also did a little debugging of some new features in MPj Equinox. I must admit that this 14" is a joy to use and a permanent setup is great - I open the dome, push a few buttons and I am observing. Just me and the mosquitos. Lots of mosquitos. I had to keep brushing them off the PowerBook screen to see what I was doing. I did not get bit, but then I use a US military insect repellant called Ultrathon and wear cloths sprayed with permethrin - not that I am paranoid about West-Nile or anything.
After I took some Moon images a neighbor knocked on the dome and we looked at the Moon and a few bright globular clusters for about an hour. I kept observing until the Moon was down and the sky got dark. Then Mars came up. It should be spectacular later this summer when it is higher in the sky and you don't have to stay up so late to see it. My program says it is magnitude -1.5 and only 78 Mkm from Earth. Wonderful through the eyepiece.
I strongly recommend retirement. If you want to stay up until 4:00 AM, hey, just sleep in the next morning.
The dome survived hurricane Juan! I was on vacation in NH when I heard about the hurricane, but the US news and weather channel did not give any details at all. I came back as soon as I could and had no idea if I had a dome and telescope left, or even my house for that matter. Power here was out for four days.
When I drove down my street I could see my house was still standing so I jumped out of the car and ran down to the dome. There it was, completely intact, no cracks, no shift, shutters in place, not a thing wrong. Some rain did get inside, probably blown in under the shutters, but the bag over the scope was still in place so no rain got on the scope. Absolutely amazing. I had visions of my dome sailing out to sea and my scope sitting in a tree crumpled beyond repair. I think I was very lucky.
Halifax is a disaster area. 100 year old trees are gone and I counted 20 large trees down on power lines between my location and Halifax. Power transmission towers crumpled, boats sunk, houses and cars were crushed everywhere. My house has some damage, but nothing major. I have a roof shingle (not mine) imbedded in my back deck and several facia boards missing, but not much else. Well, if you don't count the leaves and twigs imbedded into my siding. Winds here were over 150 km/hr sustained with gusts up to 176 km/hr. I think the hurricane eye went right over the dome.
I recently bought a SBIG ST-2000XM CCD camera. And yes, I had to go over to the dark side to get software to control it. There is nothing like being forced to use Windoz to re-affirm the elegance of OS X. In version 4.1 of EquinoX I added a graphic to show the imaging and tracking CCD outlines because I discovered that finding a suitable guide star can be very difficult. After fighting with the PC, Windows XP and the camera software I have managed to get a few decent deep sky images. I will add a CCD imaging page to this site once I accumulate a few more shots. I am also considering writing a OS X interface for the SBIG - depends on how frustrated I get with the PC.
I have a horrible dew problem in the dome, especially now that it is getting much colder at night. The scope fogs over in a matter of minutes. Every night water literally drips down on the inside of the dome. My carpet never dried out all summer. So I just installed a Kendrick Dew Removal system. First clear night I get should tell me how good it works. I have been using a hair dryer, but the dew (more like frost) on the front lens of the scope returns quickly and if I am using the SBIG the autoguide is lost and the focus changes. It had become such a hassle that I gave up using the SBIG while I waited for this to arrive.
The last time I was out in the dome the shutter lock froze. I could close the shutter but I could not lock it. Nova Scotia had it first real blizzard on the 27th - 40cm of snow and high wind. The next day I fired up the snow blower and cleared huge drifts off my driveway. I then began to clear the path out to the dome. As I got closer I suddenly realized that the shutter was fully open! Apparently the wind had rattled the shutter handle open, wind had gotten under the shutter and one shutter section had completely blown off the dome. The dome was full of snow and all the electronics - power supplies, USB hubs, cable connectors, etc. - were buried under drifts of snow. After about an hour of walking around through waist high snow drifts looking for the shutter section I found it half way up a tree about 30m from the dome.
I have spent the past few days shoveling out the dome and trying to dry all the electronics with a hair dryer. Of course, when the wind chill is -30C a hair dryer does not do a whole lot. I have a small electric heater going 24 hours a day, not so much for the heat (that would be like trying to warm up Nova Scotia) but to keep the air circulating. The carpet is now a solid block of ice and thick frost forms on everything. It may be quite some time before I dare to start powering everything up and use the scope.
I have mounted my ETX-90 onto the scope as a guide scope and to test the Equinox webcam autoguide function. This shot also shows my dew shield - it clears the inside of the dome by an inch! I have dried everything out as much as possible from the snow that filled the dome when the shutter blew off but I have not tried powering everything up yet.
11 January 2005
[Home]
[Notice Board]
[Site Map]
[FAQ]
[MPj Equinox]